
“Eye of newt and toe of frog, Wool of bat and tongue of dog, Adder’s fork and blind-worm’s sting, Lizard’s leg and owlet’s wing…”
-Second Witch, Macbeth, Act IV Scene I
With Halloween just two weeks away, it’s time to get into the spirit— cider style.
For this insidious installment, I’ve exhumed a diabolically delicious drink from the depths of my recipe vault for you to take a stab at. It’s a ghoulishly green grog, afflictionately referred to as Swamp Cider, and it’s brain-dead simple to make.
If you don’t drag your feet, you even have a bloody good chance of summoning up a freshly fermented batch of this beastly beverage to serve your fiends and family in time for All Hallows’ Eve. Besides, you know what they say: Idle hands are the devil’s workshop…
[Point of Clarification: This recipe/tutorial is for creating a fermented, and therefore alcoholic, cider. For a non-alcoholic version of Swamp Cider, try blending roughly equal parts green juice (see below) and Martinelli’s (non-alcoholic) Sparkling Cider, or force carbonating green juice with a product like SodaStream. Now, on with the show…]
Here’s the bare bones list of the two things you’ll need in order to brew up to 5 gallons of Swamp Cider:
1. Green Juice. I use Trader Joe’s Green Plant juice which contains a fair amount of apple juice; it tastes good and won’t break the bank.
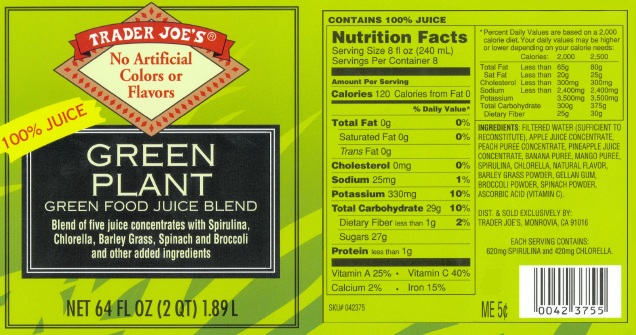
There are some other more pricy blends out there that may work for you including Naked’s Green Machine, Odwalla’s Superfood, Suja’s Glow, Juice Press’ Love at First Sight, BluePrint’s Green Juice, Organic Avenue’s Mellow Love, etc. Ultimately, the decision is yours as to which green juice tastes best to you, so feel free to sample a few, and go with your favorite. Just keep in mind that some green juice blends are thicker than others and may need to be diluted a bit with quality, 100% apple juice or apple cider (fresh pasteurized cider from an orchard is best, but of course not necessary).
 Note! It’s deathly vital that your store-bought juice DOES NOT contain the preservatives sodium benzoate or potassium sorbate. These chemicals, which should be clearly noted on the ingredients list, are usually a death sentence when it comes to your cider ever fermenting and becoming alcoholic. Citric acid or ascorbic acid is fine. Again, it’s also critical that you actually enjoy the taste of the green juice that you’re using because the final product will retain much of the original aroma and flavor components.
Now, if you already have a killer green juice recipe in your spell book, you could conjure up your own concoction, just bear in mind that your blend should contain approximately 25-50% apple juice or cider. If you’re feeling a bit sluggish, you can always pick up a tasty green blend at one of your favorite juice bar haunts. There’s just one catch… Your homemade juice and most likely the fresh pressed juice at the juice bar is not pasteurized (flash boiled), which means there will almost certainly be wild yeast and possibly certain spoilage bacteria in it which can produce off-flavors in your final cider. In this case, the options are (1) heat your juice to 180°F for 45 minutes (do not boil), which will kill most bacteria and wild yeast, or (2) just add the unpasteurized juice and cross your fingers…
2. Yeast. Yeast is the age old fungus that will provide the magic needed to transform your limp green juice into a lively libation. The yeast, which comes in either dry or liquid form, will consume the sugars in your juice and convert them into alcohol and bubbling CO2.
Using baker’s yeast will probably ferment your Swamp Cider, but it might also produce more bread-like aroma and flavor components, so it’s not exactly my first choice— ever.
For this recipe, I recommend a liquid English Ale Yeast (WLP 002) which you can find at your local or online homebrew store. Shipping liquid yeast through the mail usually costs more than shipping dry yeast, not to mention, liquid yeast usually costs about double what dry yeast does (about $8 VS $4, respectively). So if there is no local homebrew shop in your area, you could use a dry English yeast such as Windsor Ale Yeast, which will be cheaper to ship. English Ale Yeast generally will leave you with a semi-sweet cider, whereas cider and wine yeasts have a tendency to finish dryer, sometimes bone dry. The amount of yeast sold in a single packet or vial at homebrew shops will be enough to ferment up to 5 gallons of Swamp Cider, and certainly no problem for fermenting lesser amounts.
Basic Procedure
1. Combine your green juice and yeast into a clean* food-grade plastic container (up to 5 gallons), and cover with aluminum foil. You can poke a few holes in the foil with a fork to allow the CO2 produced by the yeast to more easily escape. If using a glass container, DO NOT tightly seal a lid onto the jar, or the jar will most likely explode due to the building pressure of the CO2 produced by the yeast. Remove the lid and replace with aluminum foil like mentioned above.
Tip! Stretching the Yeast: Buying multiple packets of yeast can get pricy, so if you’re fermenting in two containers, but only have one vial/packet of yeast, you can divide the yeast in half (just eyeball it) between the two containers. If fermenting in more than two containers with only one vial/packet of yeast, you could add the yeast to a cup of green juice or cider, shake or stir well, then evenly distribute the yeast to the different containers.
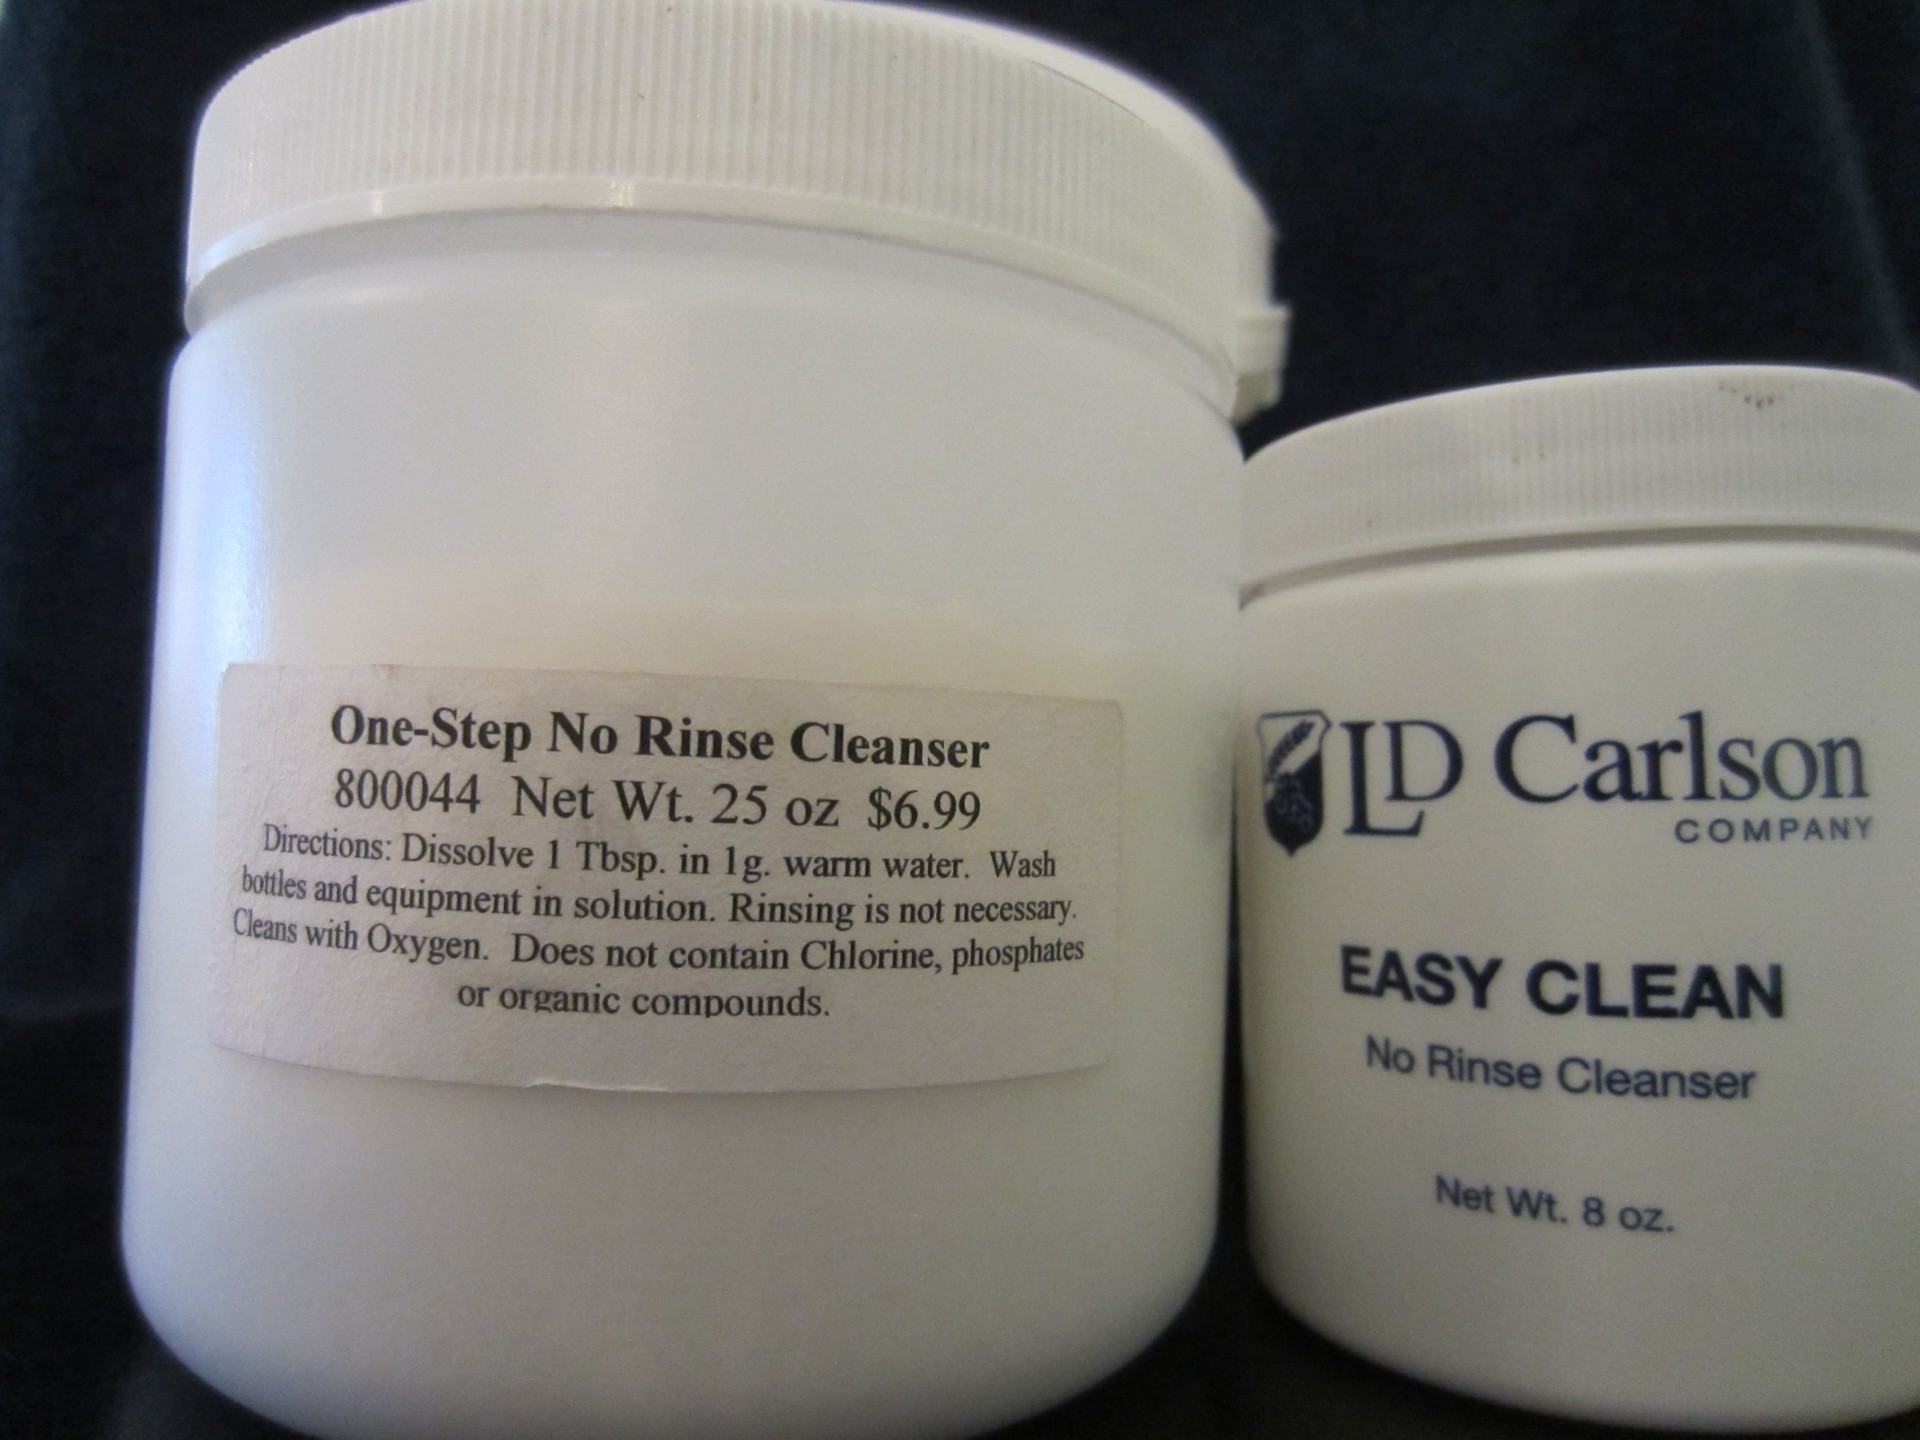
[* Cleaning: I recommend rinsing the inside of your containers, or any equipment coming in contact with your yeast or unfermented cider, for 30 seconds with a product called “One-Step”. One-Step is a human-friendly, scentless cleanser which can be found at your local/online homebrew shop. It comes in a dry, white powder form which you simply mixed with water for use; usually 1 table spoon to 1 gallon of water.]
2. Place container in a consistently cool place (60°F is ideal) and wait 1-2 weeks. At above 70-75°F, the cider can start taking on stronger alcoholic notes. Too far below about 55°F, and the cider may not ferment at all.
[Fermenting Swamp Cider in glass jug. Notice a small grimy ring called a “krausen” will form near the top of the liquid; this is normal.]
3. Drink. Straight from the container, you’re cider will be slightly effervescent at best, but generally flat, or, as it’s referred to in the cider world, “still” or “petulant”.
Optional: If you want to carbonate your cider, the easiest/cost-effective way to do it if you don’t have a kegging system or a product like SodaStream is to wait until fermentation is complete (1-2 weeks), transfer your cider to cleaned plastic containers, and then add a measured amount of sugar back into your cider. If you want your Swamp Cider ready by Halloween, then ferment for 9 days, then bottle for 5 days. Here’s a program to help you determine how much: Priming Sugar Calculator
If you want to bottle in glass, you need to make sure the glass you want to use is thick enough to handle the carbonation. Swing-top soda and beer bottles are fine, but the standard wine bottles that are used for uncarbonated wine are too risky. If you want to bottle in regular beer bottles, here’s how you do it: How to Bottle
Well, boils and ghouls, you’re now possessed with the knowledge of how to make a sinister Swamp Cider, which means that you can get to brewing, and I can stop invoking the Crypt Keeper….
Bone appetite!
[Thirsty for more? Below you’ll find a little fermenting F-A-Q just for Y-O-U. Enjoy.]
Like this blarticle? Well, thanks- you’re far too kind. Want to read more beer inspired thoughts? Come back any time, subscribe to our RSS feed or follow us on Twitter at twitter.com/beersyndicate.
Or feel free to drop me a line at: dan@beersyndicate.com
Hi, I’m Dan: Beer Editor for Beer Syndicate, Beer and Drinking Blogger, Gold Medal-Winning Homebrewer, Beer Reviewer, AHA Member, Beer Judge, Shameless Beer Promoter, and Beer Traveler. Interests? Beer.

FAQ- (Frequently Axed Questions)
Is it really that simple?
Yep. If you want to learn how to create different kinds of cider recipes or improve your technique, you can read more about it on the aptly named tutorial How to Make Great Cider, but if I had to pick out the two most important bits, it would be this: (1) be clean, and (2) control the temperature of your cider during fermentation. Being clean means not only keeping your hands clean, but making sure your equipment is clean too. Controlling your fermentation temperatures can be a little more complicated. At the beginner level, either finding an area of the house that’s consistently about 55-65°F, or putting your fermenting containers in some sort of clean bucket or bin, adding 60°F water up to about half way of your container(s), monitoring with a thermometer, then occasionally adding ice to reduce the temperature when necessary. Just don’t let any water from the bin get inside your fermenting cider— who knows what’s floating around in it.
How will it taste?
Depends on the quality of the green juice and what type of yeast that you use. As long as you enjoy the taste of the green juice prior to fermentation and you’re running a clean operation, your Swamp Cider should turn out well.
Can I pour the yeast right into the green juice containers?
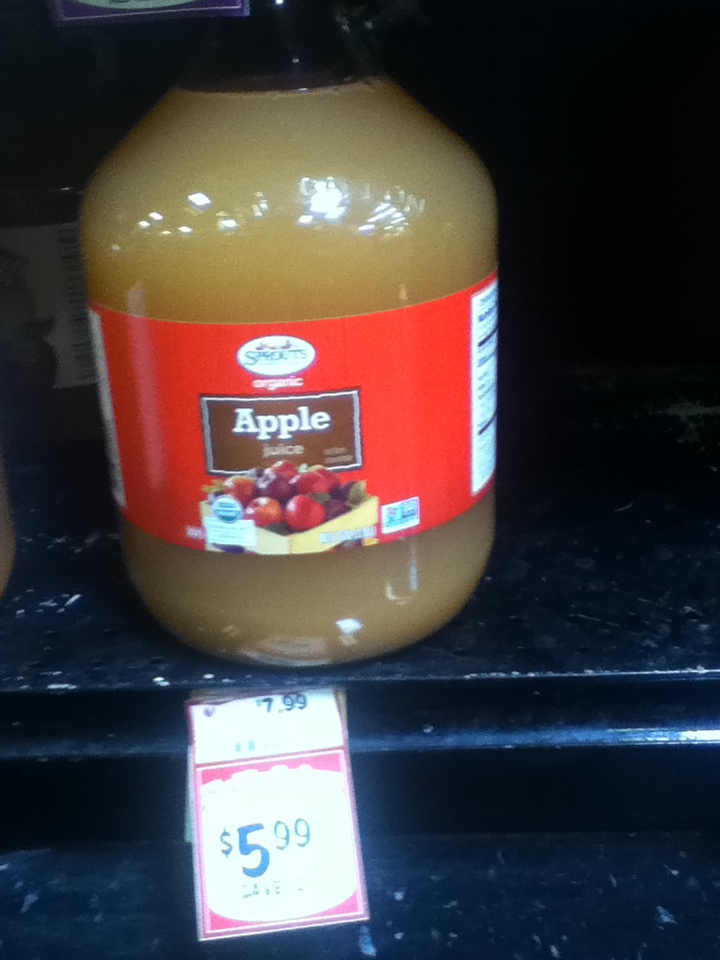
Yes, but most containers you might find in the grocery store are relatively small, containing usually less than a gallon. If it were me, I’d ferment at least 1-2 gallons at a time (one gallon equals about ten 12 oz beer bottles). One little trick I use is to buy the 1 gallon jugs of apple juice/apple cider from the grocery store (Sprouts/Whole Foods, etc.), drink or transfer half the juice, and then ferment right in the glass jug. An identical 1 gallon glass jug at the homebrew shop runs about $5-$6; I found the same one at Sprouts on sale for $5.99, except it was filled with organic unfiltered apple juice. You do the math.
Will it make me sick?
Extremely unlikely. If you’re clean and keep the fermenting cider away from germ spreaders like pets, kids, bugs, and the undead, there is very little chance some bad thing is going to get into your cider; no more so than would get into a bottle of soda kept in a pantry.
How much alcohol will be in the cider?
Depends on how much sugar was in your green juice, but probably somewhere in the 5-7% range.

")


